< Previous | Contents | Manuals Home | Boris FX | Next >
Checking Tracker Error Curves
After solving, the tracker 3-D error channel will be available in the Graph Editor. It is important to understand the 3-D error: it is the distance, in pixels, on each frame, between the tracker’s 2-D position, and the position in the image of the solved 3-D tracker position. Let’s work this through. The solver looks at the whole 2-D history of a tracker to arrive at a location such as X=3.2, Y=4.5, Z=0.1 for that tracker. On each frame, knowing the camera’s position and field of view, we can predict where the tracker should be, if it really is at the calculated XYZ. That’s the position at which the yellow X is displayed in the camera view after solving. The 3-D error is the distance between where the tracker actually is, and the yellow X where it should be. If the tracking is good, the distance is small, but if the tracking has a problem, the tracker is away from where it should be, and the 3-D error is larger. Obviously, given this definition, there’s no 3-D error display until after the scene has been solved.
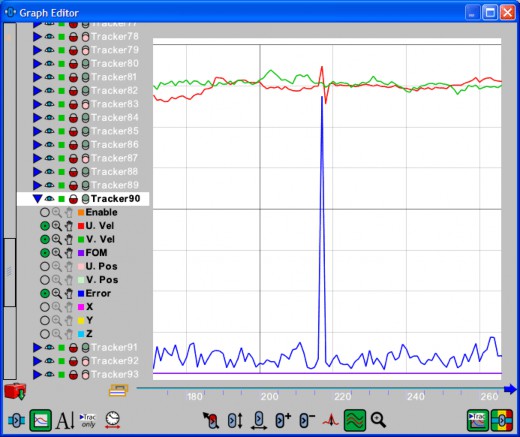
You should check these error curves using the fundamentals described earlier in Pre-Solve Tracker Checking, but looking at the Error channel. Here we’ve used isolate mode ![]() to locate a rather large spike in the blue error curve of one of the trackers of a shot.
to locate a rather large spike in the blue error curve of one of the trackers of a shot.

This glitch was easy to pick out—so large the U and V velocities had to be moved out of the way to keep them clearly visible. The deglitch tool ![]() easily fixes it.
easily fixes it.
![]()
You can look at the overall error for a tracker from the Coordinate System panel
. This is easiest after setting the main menu’s View/Sort by Error, unselecting all the trackers (control/command-D), then clicking the down arrow on your keyboard to sequence through the trackers from worst towards best. In addition to the curves in the graph editor, you can see the numeric error at the bottom of the tracker panel
![]() : both the total error, and the error on the current frame (also visible in the graph editor's Number Zone). You can watch the current error update as you move the tracker, or set it to zero with the Exact button.
: both the total error, and the error on the current frame (also visible in the graph editor's Number Zone). You can watch the current error update as you move the tracker, or set it to zero with the Exact button.
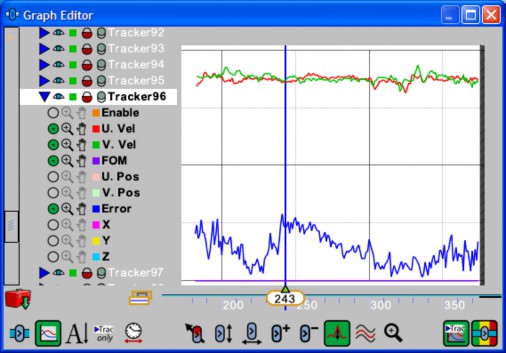
For comparison, following is a tracker graph that has a fairly large error; it tracks a very low contrast feature with a faint moving highlight and changing geometry during its lifespan. It never has a very large peak error or velocity, but maintains a high error level during much of its lifespan, with some clearly visible trends indicating the systematic errors it represents.

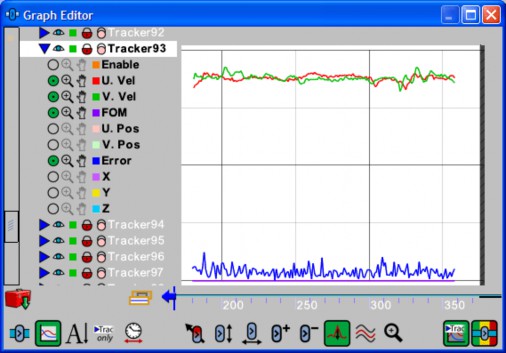
And finally, a decent tracker with a typical error level:

The vertical scale is the same in these last three graphs. (Note that in the 3 rd one, the current time is to the left, before frame 160 or so, hence the blue arrow.)
You can sort the trackers within the graph editor’s Active Trackers node by
changing Sort Alphabetic ![]() to Sort By Error
to Sort By Error ![]() .
.
The SimulTrack view can also be helpful in quickly looking at many or all of the trackers, especially in Sort By Error mode. The error curve for the tracker is shown in each tile (as long as right-click/Show Error in the SimulTrack view is on).
Do not blindly correct apparent tracking errors. A spike suggesting a tracking error might actually be due to a larger error on a different tracker that has grossly thrown off the camera position, so look around.
©2026 Boris FX, Inc. — UNOFFICIAL — Converted from original PDF.


