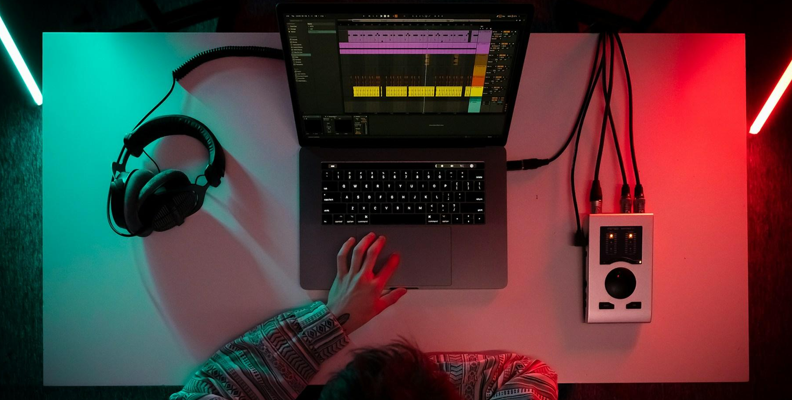
Sometimes, when you're learning about audio production, what a particular tool does or what a particular approach is can be obvious. De-hiss - takes away hiss. OK, pretty clear! However, sometimes the terminology can be a little more obscure and hard to figure out. So it is with dithering.
Dithering is an important part of audio mastering, so it's good to have a handle on what it is and how to use it.
What is Dithering in Audio?
To put it as simply as possible, dithering is the intentional addition of random, low-level noise to a digital signal (image or audio) to reduce artifacts or distortion when reducing resolution, such as a color palette or lowering bit depth. It masks quantization errors, replacing harsh digital artifacts with a subtle, random noise or "hiss".
As a rule, dithering is the last thing you will do as part of the audio mastering process. That doesn't mean you can't apply it earlier because you can - any time you need to reduce the bit depth of your audio signal, you can apply dither. This should still only be done at the mastering stage, not when you're mixing. Adding noise at that stage is not a good idea!
There can be a few reasons why you might want to reduce the bit depth of your audio file, but the most common one is size. If you're preparing a file for streaming services or for storage when the amount of storage you have is limited, reducing the bit depth will allow you to save your audio as a smaller file.
However, there is a trade-off for the smaller file size. Reducing the bit depth introduces quantization distortion, which then needs to be addressed. This can be particularly noticeable when dealing with certain types of music that are highly dynamic recordings - chamber music or orchestral music, for example. The dynamic range of the recording is wide, so the distortion caused by quantization error is particularly noticeable.
This is what dithering is for - dealing with the quantization that results from that lowered bit depth.
What is Quantization?

To understand what quantization is, you need to understand a little about the way that audio is captured and recorded using digital technology rather than analog tape.
When audio is captured by your computer's DAW (Digital Audio Workstation), it needs to be converted from an analog signal into digital audio that your computer can understand. You use an analog-to-digital converter which captures "snapshots" of the audio signal at a sample rate and bit depth. The bigger the sample rate and bit depth are, the better quality the audio signal will be.
This is analogous to the way a digital video camera captures images. It doesn't capture one single long piece of video; rather, it takes thousands of images and plays them back extremely rapidly to create the illusion of movement. The more frames are captured, the better quality (or higher resolution, to put it another way) the video is. It's the same with audio - the better the bit depth, the better the audio signal will be.
The sample rate is the number of times in a single second that the audio waveform's amplitude is captured. But the sound that's being recorded is continuous, whereas the audio that's being captured is not - it's only being done a set number of times per second.
If you imagine a sine wave line, it's a single, unbroken line. However, trying to display that digitally would mean there are lots of "steps" between the lines, like this.
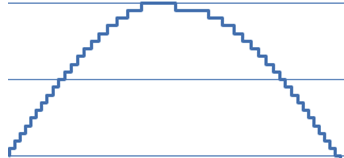
The act of matching the audio signal to these "steps" is what quantization is.
What is Quantization Noise?
Quantization noise is the harmonic distortion that comes from the difference between the actual analog sound you are capturing and the nearest quantization "step" that occurs when the audio signal is digitized. When you hear quantization noise, what you hear is the distortion caused by this noise shaping. The lower the bit depth, the more distortion will occur as the analog signal is converted to digital.
This can be emphasized even more if you reduce the bit depth of the digitized signal after you have finished mastering. That's because when you reduce the bit depth, there are fewer values available to describe the sound, so fewer values are available to recreate the original analog signal as digital audio. That means you will have a smaller dynamic range and a much flatter frequency response compared to the original signal.
If you have a piece of audio that's had its bit depth reduced, you won't miss it! The sound can become tinny, you can have sudden quiet moments, odd-sounding artifacts... it will make the whole listening experience sound terrible. You want to avoid this quantization distortion as much as possible.
What Does Audio Dithering Do?
The whole point of dithering is that it actually helps to improve and "restore" some of the quality to the audio that's at a lower resolution. It does this by removing the quantization distortion and instead adds in random-sounding white noise. This is known as dither noise.
By adding dither noise to the recording, it allows the unpleasant distortion caused by lowering the bit depth to be replaced by, essentially, hiss. Dithering algorithms generate small, random amounts of noise that replace the distortion caused by the reduced bit rate.
It's worth saying that this won't restore the quality of the audio to the original, but it will definitely be an improvement over an undithered track. The harmonic distortion caused by a quantization error cannot ever be wholly fixed by dither noise, but there will still be a marked improvement in the quality of the digital audio.
When to Use Dithering
Firstly, it's important to remember - only ever use dithering at the mastering stage of what you're working on! Ideally, your dithering plugin should be the very final thing in your signal chain (or the last thing you do in your DAW, if you are using a DAW's built-in dithering tool).
You should also only use dithering when you are exporting a file to a lower bit depth than the original. The whole point of dithering is to improve the quality of lower bit depth audio, so that's definitely the only time you will need to use it.
How to Dither Audio With Samplitude

Samplitude is Boris FX's professional digital audio workstation (DAW). This is a Windows-only DAW that provides professional, studio-quality results and is a fantastic DAW for any budding music producers or audio engineers.
Samplitude makes dithering a simple task even for beginners. Remember, though, dithering is the last thing you should be doing after the track has been fully mixed and mastered.
Firstly, load the track you want to reduce the bit depth on by going to File -> Open and browsing for your file.
Once your file has loaded, go to File -> Export Audio.
In the dialog box that opens, choose the file format you want to use (.wav, .MP3, etc.)
In the Formats setting dialog box, you then need to select a bit rate that is lower than the bit rate of the current file. For example, if the bit rate of your track is currently 24 bits, select a bit rate of 16. The bit rate you choose will vary depending on the size of the file you want to generate, so select the bit rate accordingly.
Once you have done this, choose Dithering, and you will see a few options.
- No Dithering: Self explanatory!
- Triangular Spread Noise: This is the most common setting and the one you're most likely to use. This will add a low-level, discreet amount of noise to cover and mask the quantization errors.
- Linear Dithering: Will add dithering in a linear fashion. Depending on the track, this can be a little more obvious than Triangular spread noise.
- Dithering Depth: Changes the amount of noise. Normally, you would add around 0.5 bits up to a maximum of two bits.
When you've made your selections, hit Save, and your track will be saved with the reduced bit depth and with the dithering added.
As with many production techniques, it can take a little bit of trial and error to figure out exactly how much dither you want to add to a track. There's no one "correct" setting or correct way of going about dithering because every track you want to apply it to will be different. Different tracks mean different dither settings.
It's a good idea to experiment on a track you don't mind messing about with so you can get a good feel for the types of dithering that will be required.
With a little experience and practice, you can really make dithering work for you in remarkable ways, and there's no better DAW to use when learning how to dither than Samplitude.
Final Words
Dithering might not be the most spoken-about production method, but it's one that, once you've found out about it, can be absolutely invaluable. If you are reducing bit depth to cut down on file size but want to preserve as much quality as possible, dithering is the way to go.
It's been quietly helping audio engineers for a long time, and now it can help you too!
FAQ
Should I Turn Dithering On or Off?
By default, dithering should be turned off. Dithering adds noise to your recording, so if you have a high enough bit rate - anything over 32-bit - the resolution of your audio will have enough detail that you won't require dithering.
However, the lower the bit rate, the more useful dithering is likely to be. It should be the last thing you do in your mastering process after you have reduced the bit depth of your recording to the level you require. Different amounts of dither will have different effects on your track, so play around a little to get a feel for dither.
Remember - not every track will require dithering, so use it selectively and carefully to enhance your tracks. Dithering helps even low-resolution tracks sound better, but knowing how to use the right amount is critical.